+8615280858852
+8615280858852

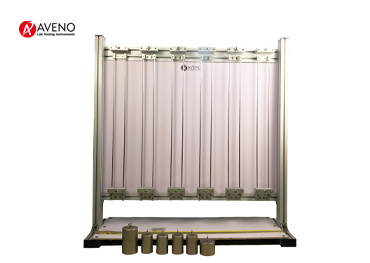
AG38 Fabric Stretch & Recovery Tester Operating specification
Prepare test pieces
1. sampling
2. Sample preparation
2.1 The length of the two long sides of the sample is roughly the same to the width of the sample is 50mm ± 1mm
2.2 Fold the end of the sample at 32 mm at one end of the specimen and suture at 25 mm of the crease to form two loops.
2.3 Cut the crease at the end of the specimen into a slit of about 10 mm.
2.4 Place the prepared sample on a smooth surface and let it stand for 30 minutes.
2.5 When the sample is in a free state, two marking lines are symmetrically marked from both ends of the intermediate position, and the spacing is at least 250 mm ± 1 mm.
Steps
1. Confirmation before operation
2.Fabric Stretch after applying a Specified Tension
2.1Carefully remove a sample from a set of 3 samples, Clamp one end flat in the upper clamp and hang the crease end freely
2.2 Test the spacing of the two marking lines with a steel ruler, Accurate to 1% or 1mm, and record the measured value as O1.
2.3 Insert the hanging rod into the ring at the lower end of the sample
2.4 Select a 4Lbs or 3Lbs weight according to the relevant product agreement. If not, use a 4Lbs weight.
2.5 Gently pass the selected weight through the slit at the end of the specimen and hang it on the hanger
2.6 Put down the weight so that the weight is completely loaded on the sample for 3s, hold the weight so that the loading force is 0, and the whole process is 5s.
2.7 Repeat step 2.6 to load the sample 3 times.
2.8 At the 4th load, the distance between the two marking lines is measured within 10s, accurate to 1mm, and the test value is recorded as A.
2.9 The spacing of the two marking lines was measured at 30 ± 1 min to the nearest 1 mm and the test value was recorded as B.
3.Fabric Growth after applying a Specified Tension
3.1 After the test in step 2 is completed, the loading weight is removed to allow the sample to be freely suspended.
3.2 The distance between the two marking lines was measured within 10 s to the nearest 1 mm and the test value was recorded as C.
3.3 Measure the spacing of the two marking lines after 30 ± 1 s, to the nearest 1 mm, and record the test value as D
3.4 Measure the spacing of the two marking lines after 30 ± 1 min, to the nearest 1 mm, and record the test value E
3.5 Measure the spacing of the two marking lines after 1 h ± 1 min, to the nearest 1 mm, and record the test value as F
3.6 Measure the spacing of the two marking lines after 2h ± 1min, accurate to 1mm, and record the test value G
3.7 Remove the sample, test the other two samples according to the above steps 2 and 3 and record the relevant data (O1, A, B, C, D, E, F, G)
4.Fabric Growth after Stretching to a Specified Extersion
4.1 Another set of three specimens in one specimen is clamped at one end in a fixed length and the other end is freely suspended.
4.2 Use a steel ruler to test the spacing of the two marking lines to the nearest 1 mm and record the test value as O2.
4.3 Clamp the other end of the specimen in the fixture at a fixed length and loosen the fixing knob on the right side of the clamp.
4.4 Calculate the average value of the three specimen elongation Eq2 by formula 2, calculate the total length e of the specimen stretchable, move the lower clamp downward, and stretch the specimen to e*85%, and tighten it. The knob on the right side of the fixture holds the lower clamp.
4.5 The distance between the two marking lines was measured while maintaining the stretch for 30 ± 1 min, to the nearest 1 mm, and the test value was recorded as H.
4.6 Remove the lower end of the specimen from the lower clamp and allow it to hang freely.
4.7 The distance between the two marking lines was measured at 30 ± 1 s, to the nearest 1 mm, and the test value was recorded as I.
4.8 The distance between the two marking lines was measured at 30 ± 1 min to the nearest 1 mm and the test value was recorded as J.
4.9 The distance between the two marking lines was measured at 1 h ± 1 min to the nearest 1 mm and the test value was recorded as K.
4.10 The distance between the two marking lines was measured at 2 h ± 1 min to the nearest 1 mm and the test value was recorded as L.
4.11 Remove the sample, test the other two samples as described above and record the relevant data.
AVENO Machine Recommend:
AG38 Fabric Stretch & Recovery Tester
Sales Dept Tel: +86 15280858852
Email: sales@avenotester.com
Skype: sales@avenotester.com
Web: www.avenotester.com

 online service
 +8615280858852
 sales@avenotester.com
 +8615280858852